Connection tab
Path: Vayapin → Settings → Connection
The first tab — and the only one strictly mandatory to configure. Without a valid API key the rest of the plugin can't talk to VayaPin.
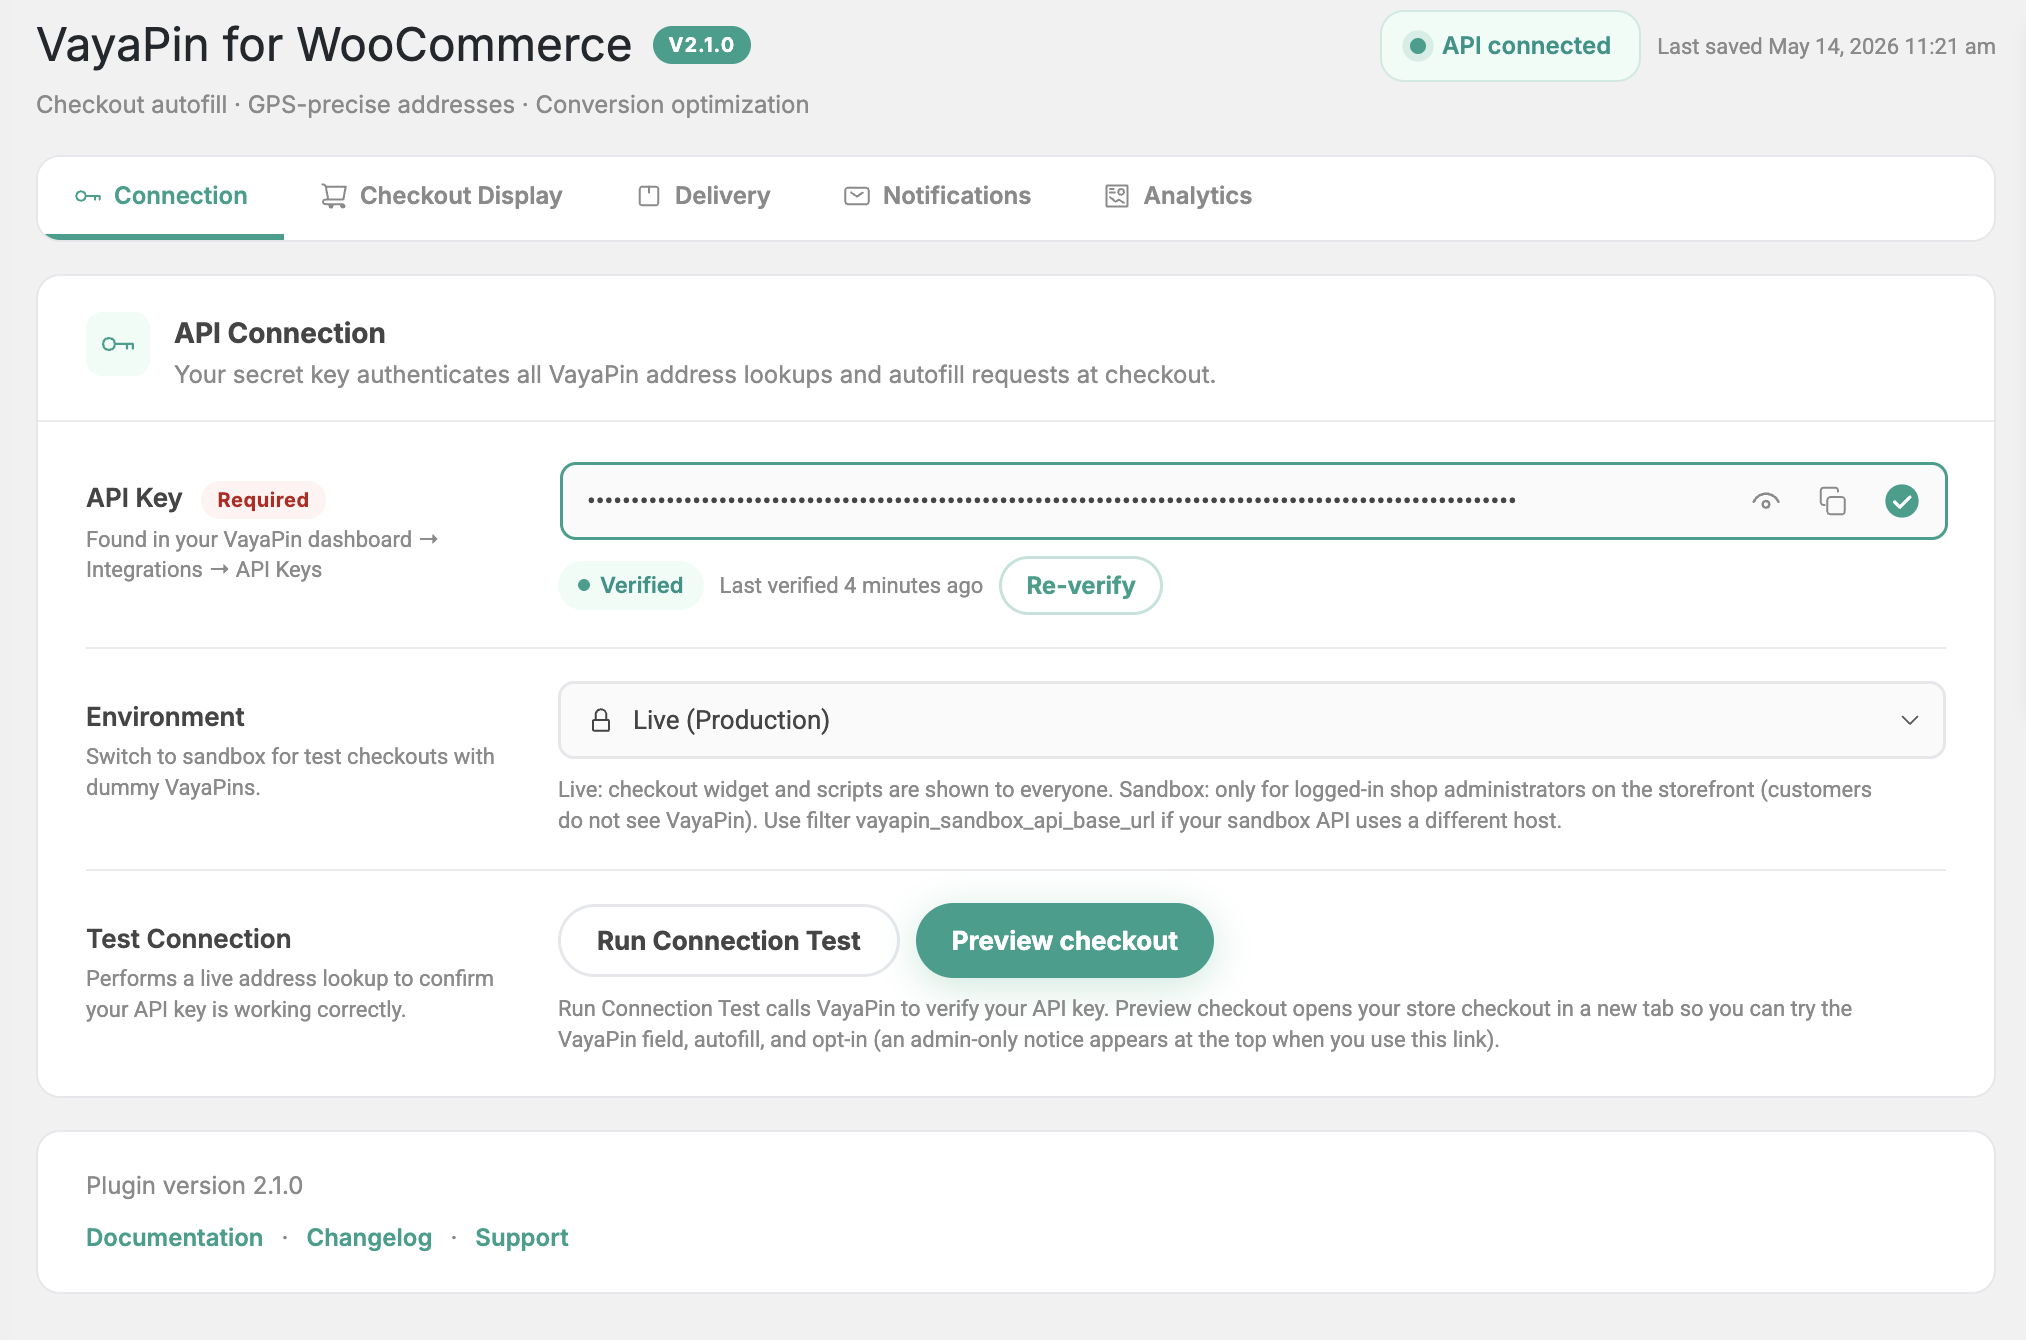
API Connection
Your secret key authenticates all VayaPin address lookups and autofill requests at checkout.
API key
- Where to get one: in the VayaPin dashboard under Developer → VayaCore → API Keys & BYOK (free Starter tier — 50 conversions / month, no credit card). See Get your API key below for the step-by-step.
- The key is stored encrypted at rest in the WordPress options table — it isn't readable in plain text from the database.
- Saving the key does not auto-verify. After saving, use Run Connection Test (see below) to confirm the key works.

Get your API key
API keys are created in the VayaPin dashboard, on the VayaCore page.
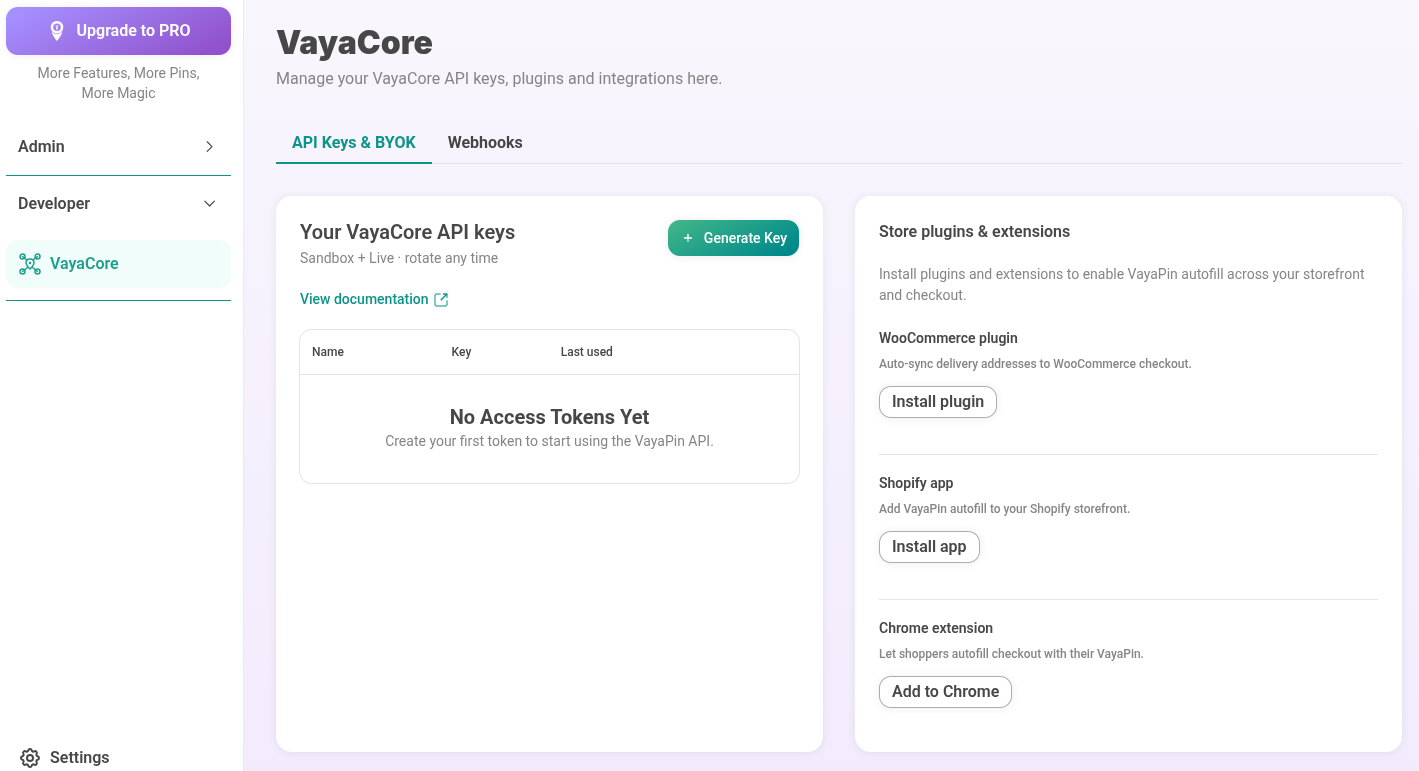
- Sign in to the VayaPin dashboard and open dashboard.vayapin.com/vayacore — or, from the left sidebar, expand Developer and click VayaCore.
- Stay on the API Keys & BYOK tab (it opens by default). The Your VayaCore API keys card lists your existing keys with their Name, Key, and Last used date.
- Click Generate Key.
- In the Generate API key dialog, enter a Key name that tells you where the key is used (for example
WooCommerce – yourstore.com), then confirm. - The Your key is ready dialog shows the full key once. Click Copy key right away — VayaPin won't show it again. If you lose it, generate a new key and revoke the old one.
- Back in WP admin, go to Vayapin → Settings → Connection, paste the key into the API Key field, click Save settings, then Run Connection Test (see Test Connection).
If your account doesn't have API access enabled yet, the dashboard may ask you to Subscribe to API Access before it lets you create a key. The free Starter tier (50 conversions / month, no credit card) is enough to get started; accept it, then continue from step 4.
Create a separate key per store (and per environment) so you can revoke one without breaking the others. To revoke a key, use Revoke key next to it in the same table — any integration using that key stops working immediately.
Environment
- Production — the plugin runs normally for every customer at checkout.
- Sandbox — the VayaPin widget is shown only to logged-in shop administrators. Storefront customers see the default checkout. Use Sandbox while configuring copy, colours, or webhooks without exposing changes to real shoppers.
Always switch back to Production before going live. While in Sandbox, regular customers won't see the VayaPin field at all.
Connection status
The header of the page shows the current status pill:
| Status | Meaning |
|---|---|
| Verified | The key was tested successfully against the VayaPin API. |
| Invalid key | The last test failed authentication — key is wrong, revoked, or doesn't match the environment. |
| Not verified | A key is saved but hasn't been tested yet (or the saved key was changed). |
If you see anything other than Verified, jump to Troubleshooting → Connection problems.
Test Connection
A dedicated section below the API key with two actions:
- Run Connection Test — performs a live request against the VayaPin API and updates the status pill. Run this after you first paste a key, and any time you suspect connectivity issues.
- Re-verify — re-runs the same test on an already-saved key. Useful after rotating the key on the VayaPin side or whitelisting a firewall.
Saving and rotating
- Click Save settings at the bottom of the page to persist the key and environment. The status pill resets to Not verified until you run the connection test.
- To rotate a key: generate a new one in the dashboard, paste it, save, then Run Connection Test. The old key is overwritten in the plugin immediately — there is no "two keys at once" mode, so swap during low traffic. Once the new key shows Verified, revoke the old key in the dashboard.
Connect the VayaPin webhook
So that VayaPin can push address updates back to your store (VayaConnect pin.address_updated events), register your store's webhook endpoint in the VayaPin dashboard and give the plugin the signing secret VayaPin generates for it.
The plugin's built-in receiver lives at:
https://yourstore.com/wp-json/vayapin/v1/webhooks
Every request VayaPin sends there is signed with HMAC-SHA256 in the X-VayaPin-Signature header. The plugin rejects any request whose signature doesn't match the secret you saved, so both halves below are required.
These settings live on the Partners tab (Vayapin → Settings → Partners, VayaConnect section). The tab only appears when the VayaConnect module is enabled for your install. The VayaConnect webhook secret is separate from the Webhook Secret Key on the Notifications tab — don't mix them up.
1. Copy your store's webhook URL
- In WP admin go to Vayapin → Settings → Partners.
- Tick Enable VayaConnect and click Save settings.
- Copy the value of Inbound webhook URL (click the field to select it). It looks like
https://yourstore.com/wp-json/vayapin/v1/webhooks.
2. Add the webhook in the VayaPin dashboard
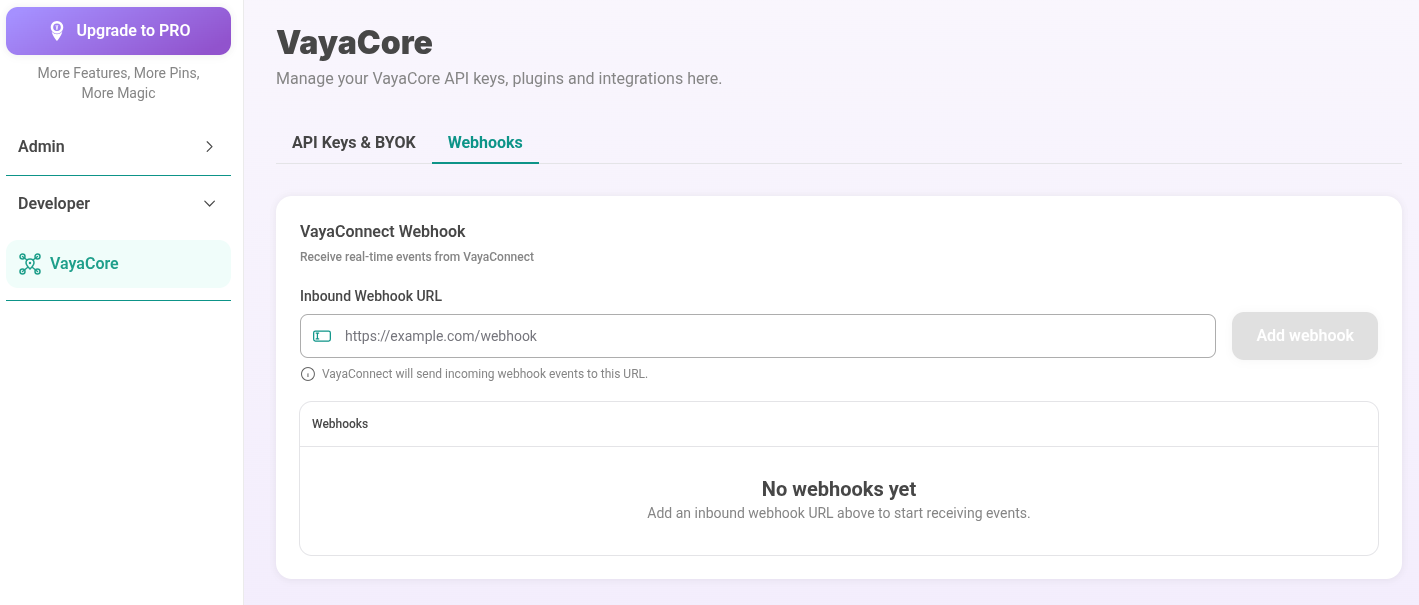
- Open dashboard.vayapin.com/vayacore/webhooks — or, from the left sidebar, expand Developer, click VayaCore, then the Webhooks tab.
- In the VayaConnect Webhook card, paste the URL from step 1 into Inbound Webhook URL.
- Click Add webhook.
- The Webhook secret generated dialog shows the signing secret once. Click Copy secret and keep it somewhere safe until you've pasted it into the plugin — VayaPin won't show it again.
The endpoint then appears in the Webhooks list on the same page.
3. Paste the secret into the plugin
- Back in WP admin, go to Vayapin → Settings → Partners.
- Paste the secret into VayaConnect webhook secret.
- Click Save settings.
The partner list and Request VayaPin address actions on the Partners tab unlock once a secret is saved.
Lost or leaked secret
The dashboard never shows a secret a second time. To replace it, click Revoke next to the endpoint in the Webhooks list (deliveries signed with the old secret fail immediately), then repeat step 2 and step 3 to add the endpoint again and save the new secret.
Treat the webhook secret like a password. Never commit it to source control or paste it into support tickets.
Accepted deliveries show up on the Webhook Logs page. Requests the plugin rejects before processing — 401 Invalid signature / Missing signature, 404 when VayaConnect is disabled, 500 when no secret is saved — are answered to VayaPin but not written to that log. If nothing arrives, check that Enable VayaConnect is ticked, the URL in the dashboard matches Inbound webhook URL exactly, and the saved secret is the one from the endpoint you added last.